US TSI 8530/8532 dust monitor maintenance and care
- 2019-07-01
- 916
- Esky Purify
Shenzhen ESKY cleanrooms Technology Co., Ltd. is a first-class gold agent of the US TSI and the only repair and after-sales service center in South China, providing you with the lowest price and the best service. Contact number:400-888-7926 0755-27799805 (switchboard).
Esky Purify recommends that you perform a factory calibration on the TSI8530/8532 dust monitor once a year. The factory calibration is an absolute calibration, which is different from the comparative calibration of a third party. The factory calibration will adjust the instrument to a (nearly new) working condition and give you a calibration certificate. This (annual test) will ensure that the TSI 8530/8532 dust monitor is always in the best working condition. Proper maintenance of the instrument can greatly reduce the failure of the instrument and effectively extend the service life of the instrument. The following are the maintenance and maintenance suggestions for TSI8530/8532 dust monitor provided by Esky Purify:
1. Maintenance schedule
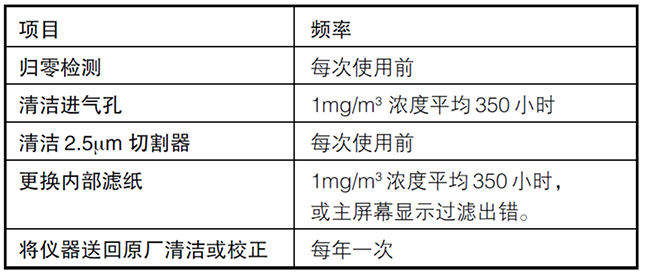
TSI 8530/8532 dust monitors require regular maintenance. Table 4-1 lists the maintenance time recommended by the manufacturer.
As shown in the figure, some of these maintenance items need to be done after each use of the TSI 8530/8532 dust monitor, some are done once a year, and some depend on the situation of dust passing through the instrument. For example, under the sampling concentration of 1mg/m3, we recommend that the air inlet nozzle be cleaned every 350 hours. This recommendation should be adjusted in proportion to the concentration, depending on the instrument usage, e.g. 350 hours of sampling at 1 mg/m3 is equivalent to 700 hours of sampling at 0.5 mg/m3, or 175 hours of sampling at 2 mg/m3.
Figure 4-1:Recommended Maintenance Schedule
After cleaning, the instrument maintains a large number of particles passing through the instrument. When the internal filter recovers, the filter error indicator on the screen should change from green to red.
2. Re-zeroing
Esky Purify recommends that you zero the instrument before daily measurement and long-term monitoring, or zero it after certain conditions change. For example, the temperature changes by 15°F (8°C) or the measurement is moved from a high-concentration place to a low-concentration place.
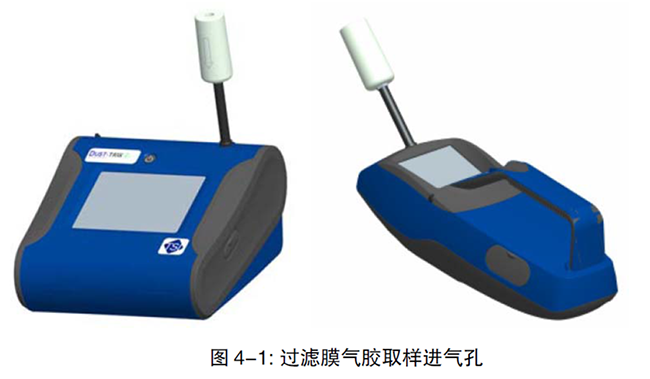
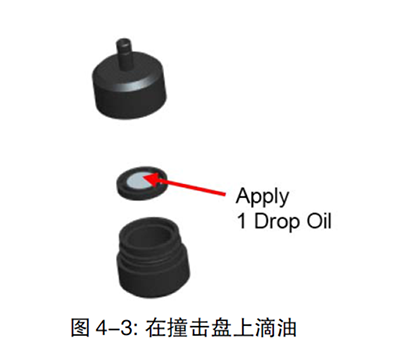
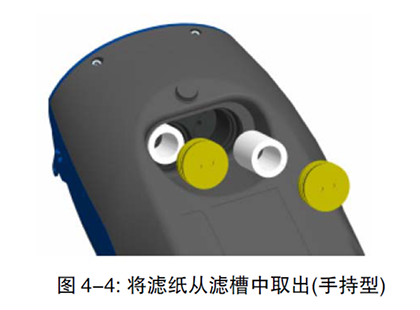
1. Place the filter membrane on the aerosol sampling inlet (as shown in Figure 4-1). 4-1;"> 4-2. Clean the sample inlet 2. Follow the instructions for zero calibration in this manual. 3. Clean the sample inlet The sample inlet should be cleaned according to the schedule in Table 4-1. 1. Turn off the instrument 2. Remove the injection port nozzle (Figure 4-2) 3. Clean the injection port. You can use a cotton swab dipped in water or a light solvent (such as isopropyl alcohol) to clean the outside of the injection port. The inside of the near-sample port can be cleaned with a small brush dipped in a light solvent. After cleaning, blow the nozzle dry with compressed air or allow it to dry completely in the air. Be careful not to blow particles into the DustTrak inlet. 4. Reinstall the inlet. IV. Clean the 2.5µm impact disk The impact disk is used for standard calibration of the instrument and should be cleaned before each use of the instrument. 1. Remove the impact disk and check the O-ring. 2. Use a small brush dipped in a light solvent to clean the inside and outside of the impact plate and the impact plate. After cleaning, blow the nozzle dry with compressed air or let it dry completely in the air. 3. Put a drop of oil on the impact plate, do not let it spill. 4. Replace the impact plate. 5. Replacement of Internal Filters The internal filter paper must be replaced according to the schedule listed in Table 4-1, or when the filter error indicator on the screen turns red. 1. Turn off the instrument. 2. Remove the old filter from the instrument. Handheld A. Remove the two filter caps at the bottom of the instrument using the tool in the accessories (PN 801668). B. Remove the old filter paper from the filter tank. If necessary, clean the filter tank with compressed air. C. Place two new filter papers into the filter tank and replace the filter cap. Note: Replacement filters will be included with the new instrument. Additional filters can be ordered from Esky Purify. Desktop A. Open the cover on the back of the instrument. B. Use the tool in the accessories (PN 801668) to remove the filter cap at the bottom of the instrument. C. Remove the old filter paper from the filter tank. If necessary, clean the filter tank with compressed air. D. Place new filter paper in the filter tank and replace the filter cap. E. Open the blue spring clip. F. Remove the 37mm filter cartridge. G. Use the included tool to open the filter cartridge. H. Remove the mesh from the filter and clean it with compressed air. Blow out the captured particles in the opposite direction. I. Replace the filter and tighten it using the included tool (PN 7001303). J. Replace the filter and secure the spring clip. Note:Replacement filters are included with new instruments. Additional filters (PN 801673) can be ordered from Esky Purify. 3. Reset the instrument after replacing the filter. Resetting the count will clear the filter error displayed on the screen. The method is as follows: a Turn on the instrument b Click “Setup”to enter the setup interface. c Click “Cum Filter Conc”to set the aerosol mass d A dialog box pops up:“Replace user serviceable filters”, select OK e A dialog box pops up:“Reset filter concentration”, select Yes to clear. VI. Instrument Storage Tips If the instrument has not been used for 30 days, the battery should be replaced. Prevent battery leakage. The instrument should be stored at a temperature of -20℃~60℃(-4~140°F).





 Home
Home Product
 News
News phone
phone